Difference between revisions of "Revenant Crew of the Atramentous"
m (→Rules Clarifications) |
|||
| Line 116: | Line 116: | ||
===Rules Clarifications=== | ===Rules Clarifications=== | ||
| + | {{RC Unique Leader Model}} | ||
{{RC Ghost Shot}} | {{RC Ghost Shot}} | ||
{{RC Undead}} | {{RC Undead}} | ||
Revision as of 23:41, 17 October 2018
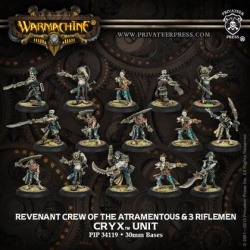
Deathbound to the Dragon King, the infamous blackship Atramentous and her revenant crew are the scourge of the Broken Coast. The revenants die a thousand deaths in service of the Dragonfather, for Lord Toruk grants them the necromantic power to rise again and the strength to destroy their enemies.
Rifleman
Weapon Attachment
When the time comes for the revenants to make their final assault, the riflemen accompany them, jumping over the bow or through an island fort's gates.
Basic Info
| Revenants | ||||||||||||||||||||||||||||||||||||||||||||||||||||||||||||||||||||||||||||||||||||||||||||||||||
|---|---|---|---|---|---|---|---|---|---|---|---|---|---|---|---|---|---|---|---|---|---|---|---|---|---|---|---|---|---|---|---|---|---|---|---|---|---|---|---|---|---|---|---|---|---|---|---|---|---|---|---|---|---|---|---|---|---|---|---|---|---|---|---|---|---|---|---|---|---|---|---|---|---|---|---|---|---|---|---|---|---|---|---|---|---|---|---|---|---|---|---|---|---|---|---|---|---|---|

| ||||||||||||||||||||||||||||||||||||||||||||||||||||||||||||||||||||||||||||||||||||||||||||||||||
| SPD | 6 | |||||||||||||||||||||||||||||||||||||||||||||||||||||||||||||||||||||||||||||||||||||||||||||||||
| MAT | 5 | |||||||||||||||||||||||||||||||||||||||||||||||||||||||||||||||||||||||||||||||||||||||||||||||||
| RAT | 4 | |||||||||||||||||||||||||||||||||||||||||||||||||||||||||||||||||||||||||||||||||||||||||||||||||
| DEF | 13 | |||||||||||||||||||||||||||||||||||||||||||||||||||||||||||||||||||||||||||||||||||||||||||||||||
| ARM | 12 | |||||||||||||||||||||||||||||||||||||||||||||||||||||||||||||||||||||||||||||||||||||||||||||||||
| CMD | 7 | |||||||||||||||||||||||||||||||||||||||||||||||||||||||||||||||||||||||||||||||||||||||||||||||||
| Unit Size | 6 / 10 0-3 WA | |||||||||||||||||||||||||||||||||||||||||||||||||||||||||||||||||||||||||||||||||||||||||||||||||
| Cost | 9 / 16 +2 per WA | |||||||||||||||||||||||||||||||||||||||||||||||||||||||||||||||||||||||||||||||||||||||||||||||||
| 1.7 each | ||||||||||||||||||||||||||||||||||||||||||||||||||||||||||||||||||||||||||||||||||||||||||||||||||
Abilities
- Entire unit
-
 Undead
 - Deathbound - If there are fewer models in this unit in play during your Maintenance Phase than there were at the start of the game, you can return to play d3 destroyed models to this unit. Place the returned models completely within 3" of the Leader.
- Gang - When making a melee attack targeting an enemy model in the melee range of another model in this unit, this model gains +2 to melee attack and melee damage rolls.
-
- Riflemen only

|
Tip ! |
Weapons
- Leader & Grunts
- Pistol - 8" range, POW 10 gun
- Cutlass - 0.5" reach, P+S 9 melee weapon
- Riflemen
- Long rifle - 14" range, POW 10 gun
- Ghost Shot - This model ignores LOS, concealment, and cover when making attacks with this weapon.
- Cutlass - 0.5" reach, P+S 9 melee weapon
- Long rifle - 14" range, POW 10 gun
Recent Changes
2017.11 Black Fleet CID
- Lost Point Blank, reducing their offensive output.
Thoughts on Revenant Crew of the Atramentous
Revenant Crew of the Atramentous in a nutshell
They're a tarpit unit with bad-to-average shooting and melee capabilities.
Thoughts on adding the WA
If you're going to take WA, you should probably take min-sized units with max WA. With Ghost Shot and a decent gun, they're quite good at killing a debuffed and/or knocked down target. Thus minimum units gets you more Riflemen gets you more attacks.
Max or Min?
There are pros and cons to taking either 3x minimum units or 2x maximum units.
| Let's compare ... | 3x Min units | 2x Max units |
|---|---|---|
| Total Revenants | 18 | 20 |
| Total Points Cost | 27 | 32 |
| Points Per Model | 1.5 | 1.6 |
| Regeneration per turn | 3d3 6 on average |
2d3 4 on average |
| Adding max WA | 9 Riflemen Total cost = 45 Points Per Model = 1.67 |
6 Riflemen Total cost = 44 Points Per Model = 1.69 |
| Less Quantifiable Stuff |
| |
So, like most things in Warmachine, a simple decision in theory (min units are cheaper per model = better) but a tough one in practice (min units are more fragile).
My advice is to field test it both ways, until you figure out which strategy works best for you.
Combos & Synergies
- They get better in The Ghost Fleet theme force.
- Captain Rengrave can help their accuracy.
- Agrimony, Crone of the Dying Strands helps out their mobility.
Drawbacks & Downsides
- Due to the way Field Promotion and Deathbound are worded and interact, your opponent can negate Deathbound for the entire game by using a Remove From Play ability on the Leader model.
Tricks & Tips
- Keep one Grunt really far back, so he can get field promoted when the rest of the unit dies.
- This won't work if the Leader is RFP'd, as described above.
- If you're using more than 1 unit, mix them together. It'll be harder for your opponent to completely wipe out one unit and/or avoid Deathbound triggering on just one unit; especially if they're using blasts/Electro Leap/etc to clear them, though this strategy is considered extremely rude if the two units are not painted differently enough to tell them apart.
Other
Trivia
- The unit (not including the WA) was originally released in Warmachine: Escalation (2004)
- The Rifleman WA was released in the Warmachine: Wrath expansion (2011)
- Sculptor (Quatermaster): Kev White
- Sculptor (Grunts): Grègory Clavilier
Theme forces
Other Cryx models
Rules Clarifications

|
Rules Clarification : Unique Leader Model (Edit)
|

|
Rules Clarification : Ghost Shot (Edit)
|
Rules Clarification : Undead - None yet. (Edit)

|
Rules Clarification : Deathbound (Edit)
|

|
Rules Clarification : Gang and/or Gang Fighter and/or Tag Team and/or Team Effort (Edit)
|

|
Rules Clarification : Combined Ranged Attack (Edit)
|

|
Note to Editors |

