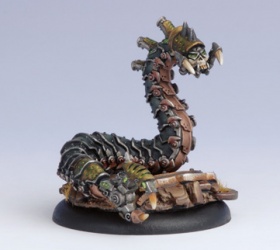
Cankerworm

From LOS Warmachine University
Revision as of 08:54, 6 February 2019 by Juckto (talk | contribs)

Jump to: navigation, search
Cryx Logo.jpg Cankerworm

Cryx Character Light Warjack

Cankerworm attacks with a breed of cunning and sense of self-preservation that makes mockery of life. The 'jack's unprecedented ability to manipulate even the most sophisticated and complex mechanikal devices makes Cankerworm a versatile and vicious tool. It waits for the mightiest of warjacks to suffer crippling damage and springs to attack the vulnerable machine. After the final strike, Cankerworm harvests weapons and other useful machinery from the fallen construct and turns them against their former masters.

Basic Info

Cankerworm
Missing Info
Cankerworm.jpg
COST {{{cacost}}}
UNIT SIZE {{{casize}}}
FA {{{cafa}}}
Warcaster 0
BASE Medium
SPD 6
STR 8
MAT 7
RAT 5
M.A. N/A
DEF 14
ARM 16
CMD N/A
ESSENCE {{{essence}}}
FOCUS N/A
FURY N/A
THRS N/A
HP 24
F. Field N/A
WJP {{{wjp}}}
WBP {{{wbp}}}
IHP {{{ihp}}}
FA C
UNIT SIZE N/A
COST 9
N/A
N/A
N/A
Warcaster 1
COST N/A
N/A
Understanding
the Statblock

Abilities

  • Warjack - All warjacks share the same set of special rules. Most notably being big and stompy. Click here for a newbie-friendly recap, or click here for the full rules.
  • Construct symbol.jpg Construct
  • Stealth symbol.jpg Stealth
  • Parry symbol.jpg Parry
  • AD symbol.jpg Advance Deployment
  • Pathfinder symbol.jpg Pathfinder
  • Salvage - When a warjack is destroyed while in this model's melee range, remove d6 damage points from this model. If the destroyed warjack was a heavy or a colossal, remove +3 additional damage points from this model.
  • Bond [ Asphyxious ] - If this model begins the game in Asphyxious's battlegroup, it is bonded to them. This model is not considered to be bonded while under your opponent's control. While this model is bonded to Asphyxious and in their control range, Cankerworm gains Reposition [5"]. (Error: Use {{Reposition 3}} or {{Reposition 5}} instead.)

Weapons

  • Bite - 0.5" reach, POW 3, P+S 11 melee weapon
    • Armor-Piercing (★ Attack) - When calculating damage from this weapon, halve the base ARM stats of models hit.
  • Replicator - 0.5" reach, POW 5, P+S 13 melee weapon
    • Adapt - When Cankerworm uses the Salvage ability, you can have the Replicator gain the special rules and weapon qualities of one of the destroyed warjack's weapons. The Replicator becomes the type of weapon adapted (melee or ranged) and uses that weapons's RNG, ROF, AOE, and POW. This effect lasts until Cankerworm uses Adapt again.

Theme Forces

When taken by Asphyxious When taken by anyone else
Cankerworm cannot be taken in a theme force.


Thoughts on Cankerworm

Cankerworm in a nutshell

Cankerworm is effectively everything you would want in a light combat jack at a bargain price. Offensively speaking, his bite will break heavies apart, the more armor the better. Average rolls give him approximately a 50% chance of breaking a system on a Khador juggernaut chassis, the gold standard of heavy jacks. Cankerworm is going to hurt them badly, he's going to require help to kill the target he's going for. Pathfinder give this little guy a very good chance of reaching his target in time.

Defensively speaking, stealth keeps him from being shot at. His defense is strong enough to justify a boost, and his armor isn't bad. Perhaps one of his greatest defensive strengths is his unique damage grid requires at least 12 damage to destroy a system, a Slayer stands at 10.66 (mitigated by a little more armor). Parry allows Cankerworm get stuck deep into enemy lines. When using the reposition bond from Gaspy, you get to see just how silppery this snake can be.

Put it together and you get a powerful anti-armor support piece.

Combos & Synergies

  • Cankerworm is fine with his armor piercing bite, but don't ignore the salvage ability altogether. It can be very advantageous in the right situation. While having Cankerworm kill targets and stealing their weapons is great, keep an eye on your own warjacks near their demise. Bring some jacks with the idea of possibly replicating their weapons in mind.
    • While the Kraken has the largest gun in the Cryx arsenal, don't discount the chain weapon Harvesters.
    • Harrowers have reach thresher weapons. If your opponents is using large group of infantry, let Cankerworm adapt to the field by keeping your Harrower nearby.
    • Erebus has stationary on hit, opponents will be quite displeased to learn that once they remove that heavy jack, the weapons might stay on the table.

Drawbacks & Downsides

  • The armor piercing attack is a special attack - anything that forbids those will condemn the Cankerworm to rely on its mediocre basic attacks.

Tricks & Tips

  • If you adapt a 2" reach or Chain Strike weapon then your melee range increases and that also increases your Salvage range.


Other

Trivia

Other Cryx models

Cryx Logo.jpg       Cryx Index       (Edit)            
Battlegroup & Similar
Warcasters

Agathia - Aiakos2 - Asphyxious1 - Asphyxious2 - Asphyxious3 - Coven - Deathjack2 - Deneghra1 - Deneghra2 - Deneghra3 - Goreshade1 - Goreshade2 - Goreshade3 - Mortenebra1 - Mortenebra2 - Rahera - Scaverous - Skarre1 - Skarre2 - Skarre3 - Sturgis2 - Terminus - Venethrax

Warcaster attachments

The Withershadow Combine - Satyxis Blood Priestess - Skarlock Thrall - Doctor Stygius (Partisan) - Madelyn Corbeau (Mercenary)

Other Warjack Controllers

Jack Marshals: Iron Lich Overseer       "Junior Warcasters": Aiakos1 - Asphyxious4 - Deneghra0

Light

Cankerworm - Deathripper - Defiler - Helldiver - Nightwretch - Ripjaw - Scavenger - Shrike - Stalker

Heavy

Barathrum - Corruptor - Deathjack1 - Desecrator - Erebus - Harrower - Kharybdis - Inflictor - Leviathan - Malice - Nightmare - Reaper - Seether - Slayer

Colossal Kraken - Sepulcher
Units, Solos, Battle Engines, & Structures
Units

Asphyxious4 - Bane Knights - Bane Riders - Bane Warriors - Bile Thralls - BO Boarding Party - BO Ironmongers - BO Smog Belchers - Blackbane's Ghost Raiders - Bloodgorgers - Marauders - Carrion Thralls - Cephalyx Drudges - Cephalyx Overlords - Mechanithralls - Necrosurgeon - Revenant Cannon - Revenant Crew - Satyxis Gunslingers - Satyxis Blood Witches - Satyxis Raiders - Scharde Dirge Seers - Scharde Pirates - Soulhunters - The Devil's Shadow Mutineers - The Withershadow Combine

Solos

Aiakos1 - Agrimony - Axiara - Bane Lord Tartarus - Bloat Thrall - BTO Mobius - Captain Rengrave - Darragh Wrathe - Doctor Stygius - Deneghra0 - Gerlak - Hellslinger - Iron Lich Overseer - Machine Wraith - Master Gurglepox - Misery Cage - Necrotech - Ol' Grim - Pistol Wraith - Satyxis Blood Priestess - Satyxis Raider Captain - Scrap Thrall - Skarlock Thrall - Severa Blacktide - Soul Trapper - Warwitch Siren

Battle Engines & Structures Wraith Engine
Theme Forces
Black Industries - Dark Host - The Ghost Fleet - Scourge of the Broken Coast
Mercenaries
Refer to Who Works for Whom and/or Category: Cryx Mercenary
This index was last updated: 2021.11

Rules Clarifications

RC symbol.png

Rules Clarification : Armor-Piercing and/or Case Cracker     (Edit)

RC symbol.png

Rules Clarification : Adapt      (Edit)

  • If you Adapt a weapon with a longer melee range, your Salvage area increases too.
  • You can use weapon rules that you'd think would require two arms, but it depends on the wording of the weapon in question. For instance, the Cankerworm ...
    • can make a Combo Smite (★ Attack) after adapting a Slayer's Death Claw.
    • can't make a Grab & Smash attack after adapting Nightmare's Wicked Claw.
  • Cankerworm can adapt and use Retribution Field Dependent weapons for two reasons:
    1. Field Dependent is a rule on the Retribution model, not the weapon, so it doesn't "carry over" to Cankerworm.
    2. Field Dependent only triggers if the Field Generator is crippled. Cankerworm doesn't have a Generator, so he certainly doesn't have a crippled one.
RC symbol.png

Rules Clarification : Salvage      (Edit)

  • Salvage triggers off friendlies dying, as well as enemies.
  • If a warjack is destroyed in melee range of multiple models with Salvage, they all get to heal.
RC symbol.png

Rules Clarification : Warjack      (Edit)

  • The Cortex/Induction core rule means a warjack cannot have more than 3 focus at any time (maybe 4 if they're really special).
    • Many abilities give out focus and don't state an upper limit (such as Convection and Empower). Despite not stating an upper limit, they are always "hard-limited" by the core rule.
    • A warjack can have more than 3 focus during a turn, though. For instance, a knocked down warjack can Power Up and be Allocated 2 focus, then spend 1 to shake knockdown, then another model could Empower it back up to 3.
  • Warjacks cannot spend focus outside of their activation. For instance, they can't boost free strikes or trigger Powerful Attack on Broadsides. (Infernal Ruling)

Inert warjacks

  • Abilities that say they cannot be used if the model is stationary (such as Shield Guard) cannot be used while a warjack is inert, either. Refer "Warcaster Destruction", page 59 of the core rulebook.

Rules Clarification : Construct - None yet. (Edit)

RC symbol.png

Rules Clarification : Stealth      (Edit)

  • Stealth models are not invisible and you can target them - you'll just auto-miss most of the time.
  • You can target them with a charge.
  • You can target them with an AOE, have it auto-miss and scatter, luckily land on top of them anyway, and that will hit them.

Rules Clarification : Parry - None yet. (Edit)

RC symbol.png

Rules Clarification : Advance Deployment      (Edit)

  • Sometimes you can attach a WA or CA that doesn't have AD to a unit that does have AD. If you do, the attachment effectively gains AD and they can all advance deploy together. (Locked Thread)
RC symbol.png

Rules Clarification : Pathfinder      (Edit)

RC symbol.png

Rules Clarification : Bond      (Edit)

  • Bonds are ineffective while the model is under your opponent's control. Refer the core rulebook.
  • Bonds & Themes
    • If a warjack/warbeast with a bond is in that caster's battlegroup, they can be taken in any theme force. Refer the core rulebook.
    • This is true even if the caster isn't a full warcaster or warlock (this interaction changed as of 2018.06).
RC symbol.png

Rules Clarification : Reposition      (Edit)

  • Models out of formation cannot move via Reposition. Refer to the "Out of Formation" rules in the core rulebook.
  • End of Activation (Edit)
You cannot resolve two end-of-activation movement effects (refer to "End of Activation Movement" in the core rulebook). For EOA stuff that doesn't involve movement, though, it gets a bit more murky:
  • Some EOA abilities explicitly state your activation ends as part of resolving the ability (like Reposition), and some don't (like Refuge).
Whether it is explicit it or not, by definition an EOA ability is the last thing you can do for that activation. For instance, if you resolve Refuge and then continue your activation to cast more spells, then you have not used Refuge at the end of your activation.
You cannot do an "at any time" ability during or after triggering an EOA ability; you cannot cast spells, purchase additional attacks, use a mini-feat, etc.
  • If you start resolving an EOA movement (such as Reposition) then you cannot trigger abilities that occur "at any time" (such as Go To Ground). Because you can't trigger it while resolving the EOA movement, and after the EOA movement your activation has ended. (Infernal Ruling)
  • For units: if any model in the unit starts resolving the unit's EOA movement, then no model in the unit can trigger an any-time ability. (Infernal Ruling)
  • See also the training article: LPG - End of Activation.